Monday, November 28, 2011

Perfume: what I wear & what I want

Okay, I admit it. I have a perfume addiction. I have a really strong sense of smell and I thoroughly enjoy owning a bunch of different perfumes so I can always smell beautiful. :) I really believe that a girl can never have enough perfume. Everything about perfume makes me happy - the scents, the bottles...I can't leave my house without spritzing myself first!

Currently I wear...

Chloe - my daily, go to scent. The perfect fresh floral scent that's feminine and easy to wear.


Hanae Mori Butterfly - my favorite winter fragrance. It's warm and cozy and perfect for colder days.


Rance Eugenie - great for the summer because it's a light, fruity-floral.


Chanel Chance - I normally only wear this one at night because it's pretty strong, but smells fabulous!


You'd think that I have enough perfume, right? Wrong!!! Here are a few bottles that I'm hoping to add to my collection soon...

Chanel Chance Eau Tendre - this is a much softer version of Chance and is a gorgeous floral suitable for everyday wear. 

Tocca Florence - this romantic perfume smells like vacation in Europe to me. It's beautiful and unique.


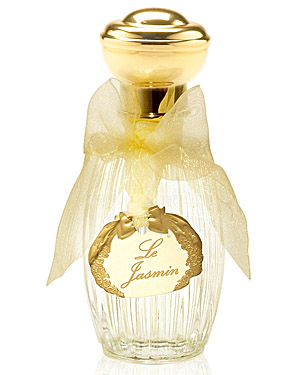
Annick Goutal Le Jasmin - jasmine is my favorite flower, but many jasmine perfumes are too heavy and old lady-ish. This one is light and young and just right. :)

Caudalie The des Vignes - a beautiful mix of jasmine, orange blossom and ginger that's unlike any other perfume I've smelled.


Miss Dior Cherie - this perfume is fun & chic and would be great for nights out.


Sunday, November 27, 2011

Quotes I Love


(all images found on Pinterest)


Quick DIY Craft - Takeout Menu Holder

If you're like me, you have lots of takeout menus and don't really have a good place to keep them. I tried keeping mine in a kitchen drawer, but they kept getting buried below other things and I forgot I had them. I put them on top of the fridge for awhile, but they were getting a bit dusty! Today I decided to do something about my menu "problem" and create something to keep them neat and accessible. Once I figured out what I wanted to do, the entire craft took just 5 minutes, so this is definitely a quick one!


What you need...

  • old folder
  • magnets with clips
  • pretty scrapbook paper
  • monogram cardstock stickers


What to do...

  1. Cut off the pocket part of an old folder. Make sure it's sturdy enough to hold your menus. Use some tape on the edges to reinforce them if you need to. (You could also make a pocket out of heavy cardstock if you had it!)
  2. Now is the fun part...decorating! I cut a piece of light blue scrapbook paper to the size of the folder pocket and glued it on the front. Then I stuck on some monogram cardstock stickers and voila! I had a pretty little pocket for my menus.
  3. Use magnets with clips to clip the back of the pocket and stick it to the fridge. Now fill it with your favorite takeout menus and enjoy!

No Bake Oreo Chocolate Balls

If you want to make a delicious treat that everyone is sure to love, you need to make these no bake Oreo chocolate balls. I can't stop eating them...they are amazing! They are super easy to make as long as you have a food processor and only require 3 ingredients!


Saturday, November 26, 2011

DIY Chalkboard Wine Glasses

I've been seeing photos of DIY chalkboard wine glasses all over Pinterest lately, so I wanted to try and make some myself! I love the idea of writing your name on the glass instead of using wine charms. Although wine charms are really cute, everyone always forgets which charm is theirs, so having names written on the glasses is a foolproof way to remember whose is whose.

I decided to make a set of 4 white wine glasses for my mum for her birthday and wanted to give my tips and tricks on how I did it.


What you need...

  • wine glasses - I bought a set of 12 cheap glasses for just $10 at Bed Bath & Beyond! 
  • Krylon chalkboard spray paint in black 
  • paper towels 
  • scotch tape 
  • newspaper (or anything like this to cover the surface where you'll be spraying) 
  • chalk in any color 

What to do...

  1. Go to a really well ventilated area. Take it from me...opening all of the windows in your 550 sq ft studio apartment won't cut it - this spray paint gets pretty smelly and will give you a headache. 
  2. Lay down newspaper on the ground or surface where you will be spraying the glasses. Anything the paint touches will turn to chalkboard, so you really want to make sure you don't get it anywhere you don't want it. 
  3. Tightly wrap paper towels over the entire wine glass, making sure you cover the stem right up to where it turns into the base. Tape the paper towels so they are securely covering the glass and no paint can get through. This is really important, so be thorough! (You could also choose to spray the entire stem and the base if you want - whatever you do, just make sure you tightly cover the parts of the glass that you don't want to be painted.) 
  4. Spray one sweeping, even coat on the base of each wine glass. Let dry for a few minutes. Spray a second coat in the same way. This part is quick and easy! 
  5. Let the glasses dry for at least 24 hours before touching them. (I put mine on a piece of cardboard on top of the fridge so my cat Phoebe couldn't knock them over.) 
  6. Once the paint is completely dry, unwrap the glasses from the paper towels. If any of the paint got on the glass or stem, use a cotton ball or q-tip dipped in nail polish remover to gently remove it from the areas you don't want it. This really works! I also used this technique to neaten up the line where the painted base turns into the non-painted stem. 
  7. Write your names on the glasses and enjoy! :) The chalk comes off easily with your hand so an eraser is not necessary. 
  8. Note: do not put these glasses in the dishwasher. Wash them gently by hand. Water from the faucet won't harm the chalkboard paint but the dishwasher is just too strong. 


Wednesday, November 23, 2011

Fluffernutter Cupcakes

It took me awhile to figure out what flavor cupcakes I'd make for Thanksgiving this year. Last year I made cupcakes with tiny pumpkin pies inside which were super fun, so I didn't want to make pumpkin again. I thought of doing apple cinnamon or carrot cake, but not everyone in my family likes carrot and we were already going to have apple pie. So I settled on Fluffernutter cupcakes because EVERYONE likes peanut butter and fluff!!! 


Fluffernutter cupcakes - recipe from How Sweet Eats
Makes 15 cupcakes

Peanut Butter & Marshmallow Cupcakes
  • 1/4 cup butter, softened 
  • 1/2 cup creamy peanut butter 
  • 1 cup granulated sugar 
  • 2 large eggs 
  • 2 teaspoons vanilla extract 
  • 1 1/2 cups all-purpose flour 
  • 1 1/4 teaspoon baking powder 
  • 1/3 cup milk 
  • 1/2 cup Reeses peanut butter morsels 
  • 2/3 cup marshmallow fluff 
  1. Preheat oven to 350 degrees F. 
  2. Cream butter and peanut butter together in the bowl of your standing mixer until smooth and creamy. Add sugar and eggs and beat until nice and fluffy. Add vanilla extract and mix for another minute or so. 
  3. Combine all dry ingredients in a large bowl. Add half of the dry ingredients to your standing mixer bowl, mixing until just combined.
  4. Add the milk. Once the milk is mixed in, add the remaining dry ingredients. Fold in peanut butter morsels and marshmallow fluff. 
  5. Pour into cupcake tins and fill 2/3 of the way full. Bake for 15-18 minutes at 350. Let cool completely before frosting. 

Peanut Butter Filling
  • 2 tablespoons butter, softened 
  • 1/4 cup creamy peanut butter 
  • 1 teaspoon vanilla extract 
  • 3/4 cup powdered sugar 
  • 1-2 teaspoons milk, if needed 
Beat butter and peanut butter in the bowl of your standing mixer until creamy. Add in vanilla extract. Then with the mixer on low speed, slowly add in powdered sugar. Increase speed to medium-high and beat for 2-3 minutes until fully combined, scraping down the sides. If frosting is too thick, add in milk and beat for 1-2 minutes more. Fill a small pastry bag with frosting, poke a hole into the cupcake (I use the thicker end of a chopstick to do this) and fill.


Marshmallow Buttercream Frosting
  • 1 cup butter (2 sticks), softened 
  • 1 tablespoon vanilla extract 
  • 1 1/2 cups marshmallow fluff 
  • 3 cups of powdered sugar 
Beat butter in your standing mixer until creamy. Add in fluff and beat for 2-3 minutes, then add in vanilla extract. With the mixer on low speed, add in powdered sugar one cup at a time until fully incorporated. Once all the sugar has been added, beat on medium-high speed for 2-3 minutes. Frost cupcakes and drizzle with melted peanut butter or top with peanut butter morsels!

Tuesday, November 15, 2011

UPDATED: Snickers Cupcakes

This Snickers cupcake recipe is my go-to recipe when someone asks me to bake for a party. This flavor combo seems to be the biggest crowd pleaser and never disappoints! The cupcakes turn out perfectly every time I make them and I know I can always count on this recipe. Plus, the caramel filled center is always a nice surprise to bite into! :)


Monday, November 7, 2011

Pumpkin Cupcakes with Whipped Cream Frosting

Last week I made these cute pumpkin cupcakes with whipped cream frosting for Halloween! I love the golden Oreos on the bottoms of the cupcakes - it’s like they have pumpkin pie crusts! The light whipped frosting was a perfect match for the spice-y pumpkin cakes.


Hello Kitty Cookies - Recipe & Instructions

A few people have asked me how I made the Hello Kitty sugar cookies I posted a photo of a few weeks ago.  Here is the recipe and my instructions on how to make these cute cookies - they are much easier than you’d think!


DIY coasters

I went to Bed, Bath & Beyond yesterday to look for some pretty coasters for my apartment. I was really disappointed to see that they only carried boring and ugly coasters that were all way overpriced. So I decided to make my own coasters, and they were super easy! Making four coasters took just 10 minutes of hands on time. In addition to making them for myself, I think that these would make great housewarming gifts!!

(click photo to enlarge)


What you need...
What to do...
  1. Cut out pieces of scrapbook paper that are just slightly smaller than the surface of your tile.
  2. Dip your fat brush into the mod podge and paint a thin layer onto each tile. One coat is enough.
  3. Affix the paper onto the tile. Let dry for 30 minutes.
  4. Paint another layer of mod podge over the top of the coasters to seal the paper in.
  5. Stick 4 felt or rubber pads to the bottom of the tile so it won't scratch up your table.
  6. Now you have gorgeous, handmade coasters! Wasn't that easy?